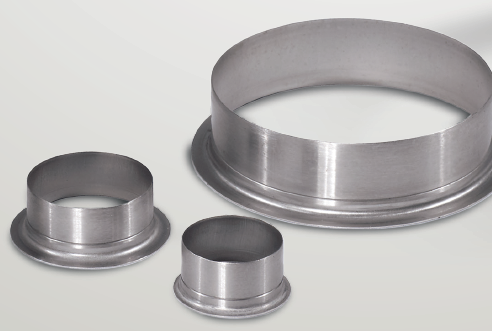
Mounting of shaft protection sleeves
Information on use
Are there notches, grooves and other wear marks on the crankshaft? How can shaft sliding surfaces be repaired? Find out how to mount shaft protection sleeves safely here.
Repair shaft sliding surfaces quickly and simply
Shaft protection sleeves offer a cost-effective alternative to replacement or timeconsuming remachining of the broken-in or worn shafts.
The shaft protection sleeve is slid easily over the worn sliding surface of the shaft. This is often possible whilst the shaft is still installed. After repair, you can use radial oil seals with the original dimensions.
Mounting the shaft protection sleeve is simple and requires little time thanks to the assembly sleeve provided and removable mounting flange.
Before mounting
Step 1 Clean and inspect the sliding surface of the radial oil seal on the shaft.
Step 2 Fill the wear marks, kerfs, grooves or large rough areas with a suitable filling compound. Uneven areas on the shaft are pushed through by the thin wall thickness of the shaft protection sleeve and have an adverse influence on the sealing effect.
Step 3 Determine the sleeve size.
To choose the correct shaft protection sleeve, measure the shaft diameter at three different points close to the worn section.
Shaft protection sleeves are available in diameters between 12 mm and 200 mm. Additional sizes on request.
The deliverable dimensions can be found in the table of dimensions.
- Mounting flange
- Predetermined breaking point
Mounting the shaft protection sleeve
 |
Attention: Shaft protection sleeves must not be placed above grooves, recesses or thread ends in the shaft. |
Step 5 Place the shaft protection sleeve onto the shaft with the flange side.
Step 6 Slide the assembly sleeve over the shaft protection sleeve. If the assembly sleeve is too short, a tube can be used as an assembly sleeve.
Step 7 Slide the shaft protection sleeve onto the assembly sleeve and over the worn position on the shaft.
Step 8 Cut into the mounting flange on the shaft protection sleeve as far as the predetermined breaking point using a side cutter and separate the flange at the rough-turned groove.
Step 9 Inspect the shaft surface for burrs once more after mounting.
|
Attention: Mount the shaft protection sleeve carefully and evenly onto the shaft. Damage which occurs during mounting negatively affects the sliding and sealing properties of the radial oil seal. |
- Removable mounting flange
Removing the shaft protection sleeves
The shaft protection sleeves can be removed from the shaft in several ways:
- By warming, the thermally expanded shaft protection sleeve can be easily taken off the shaft without damaging the shaft itself.
- Using controlled hammer blows with the peen along the width of the sleeve, the shaft protection sleeve expands and can be removed easily.
- Tearing off the shaft protection sleeve using a side cutter.
- Slitting open the shaft protection sleeve using a chisel.
|
Attention: Shaft protection sleeves cannot be re-used. |